# Ch 5. Building a Module from scratch
In this chapter, we are going to cover :
# 0. Introduction
Modular approach to a system is often considered an implementation of the traditional engineering concept High cohesion with low coupling (opens new window). By this we mean, one may extend a logic of others without breaking a flow of the original. Vue Storefront also employs the concept in order to secure 3rd party developers' happiness. This chapter opens up the belly of new Vue Storefront module structure for you as of 1.11 release.
# 1. How to bootstrap a module
If the open source authors are serious about their offspring, one must admit it's impossible to take care of all the details to all the use cases out in the wild. So the creator should expose joint point of core parts so that 3rd party developers may inject their wild logics into the working machine when they need it. Now lo and behold, jungles conquered.
When you want to tweak any open source for whatever reason needed to make it more fantastic, first thing you need to look for is modules within the code base. You may name API, hooks or observers for the same matter, but module basically represents all of them in one place in design.
In this recipe, we are going to cover how we bootstrap a module in its bare minimum in order to inject our logic into the machine. We will explore two different methods, one for manual install, the other for CLI module generation with the boilerplate. Tarzans, follow!
TIP
If you want to know the detailed difference of Manual method and CLI method, please go to Recipe 5. Packaging a module
# 1. Preparation
- You need Vue Storefront (opens new window) instance installed along with other infrastructure on your machine to build a new module and test it working.
- You need a development editor of your choice for your own convenience.
- You need Vue Storefront
CLI(opens new window) installed on your machine for Recipe B installing withCLI.
# 2-1. Recipe A (Manual bootstrapping)
- Create a folder under
./src/modules/example-modulefrom your Vue Storefront root path.
cd src/modules
mkdir example-module && cd example-module
- Create
index.tsfile in the directory
touch index.ts
- Open that file and write down the minimum signature of a module
import { StorefrontModule } from '@vue-storefront/core/lib/modules';

export const ExampleModule: StorefrontModule = function ({app, store, router, moduleConfig, appConfig}) {

}
We export ExampleModule here implementing StorefrontModule interface.
LOOK INSIDE
From ./core/lib/modules.ts, you can check out StorefrontModule signature as follows :
export interface StorefrontModule { (
  app: any, # app instance (Vue instance)
  store: Store<any>, # Vuex store instance
  router: VueRouter, # router instance
  moduleConfig: any, # module config during registration
  appConfig: any): void # VSF config
}
Judging by this signature, you can access store, router, configs from your module.
- (Optional) Add a comment in order to figure out when it's registered later :
import { StorefrontModule } from '@vue-storefront/core/lib/modules';

export const ExampleModule: StorefrontModule = function ({app, store, router, moduleConfig, appConfig}) {
	console.log('Hello World and VSF!'); # Any punch line allowed!
}
- Go to parent directory (
./src/modules) and openindex.tsfile as follows :
cd ..
vi index.ts # here you can use another editor for sure instead of vi
This file is where you can register any module you create. Now here insert registration for the module we just created as follows :
/* ... abridged */

import { PaymentCashOnDeliveryModule } from './payment-cash-on-delivery';
import { InstantCheckoutModule } from './instant-checkout'
import { ExampleModule } from './example-module' /* Import Example module we just created */

import { registerModule } from '@vue-storefront/core/lib/modules'

export function registerNewModules () {
  registerModule(UrlModule)
  registerModule(CatalogModule)
  registerModule(CheckoutModule)

/* ... abridged ... */

  registerModule(PaymentCashOnDeliveryModule)
  registerModule(AmpRendererModule)
  registerModule(InstantCheckoutModule)

  registerModule(ExampleModule) // Register Example module we just created
}
TIP
Modules can be lazy-loaded naturally. The lazy loading generally has a few advantages such as performance, low overhead during initialization and may allow code separation in more structured way. One advice is, if your module is required across the entire app, it's better to stay with the regular place that is ./src/modules/index.ts as demonstrated above. On the contrary, if your module is confined and bound to a certain route or bundle, then it might be wiser to register it inside them and load the bundle lazily.
Lazy loading, however, also has a downside that you may not be able to access some hooks such as afterAppInit because they are not lazy. (meaning only fired during app initialization)
- Run the command at Vue Storefront root path to bootstrap Vue Storefront app
docker-compose up
or without docker
yarn dev
Once the app is up and running, it will spit out tons of logs indicating the jobs done. Open your eyes wide and if you are lucky, you will pick lines similar to as follows from super fast scrolling :
# ... abridged

app_1  | [GTM] Google Tag Manager extensions is not working. Ensure Google Tag Manager container ID is defined in config null
app_1  | Hello World and VSF! # YAY! now we know it's successfully registered
app_1  | [module] VS Modules registration finished. { succesfulyRegistered: '0 / 0', registrationOrder: [] }
app_1  | Entity cache is enabled for productList null

# abridged ...
# 2-2. Recipe B (CLI bootstrapping)
- Go to your project folder or any prestine folder for your new
moduledevelopment.
mkdir example-folder
cd example-folder
- Run the
vsfCLI command as follows :
vsf init:module example-folder
The command required for module initialization here is vsf init:module and your new module name is example-folder in this case.
You will see the following result :
Module vsf-example-folder has been succesfully created!
 cd vsf-example-folder
NOTE
You might have noticed vsf put a prefix vsf by default to your newly created module name. This helps your module get compiled automatically during [INSERT UPDATE REQUIRED]
- As the result dictates, change your directory to :
cd vsf-example-folder
- List the files inside as follows :
ls *
You will see the following structure :
package.json  README.md  tsconfig.json

src:
index.ts  store.ts
Congratulation, you are good to go now.
Further scenarios of this can be found at Recipe 5. Packaging a module
# 3. Peep into the kitchen (what happens internally)
We have created a module with only a few simple steps and registered it successfully. Even though it's doing nothing practically, it was enough to grab the concept in design, and helped you transform into a module developer which is great.
We built our module house in the territory of ./src/modules. We created the door named index.ts where all the module parts are assembled and exported, although we skipped building module parts for the sake of brevity, which we will look inside more in detail later. Instead what we created in index.ts was bare minimum skeleton required to build a module and declare it's a module.
Here index.ts uncovers a module is basically a function with access to certain parts of Vue app instance and allows to interact with it. Additionally achieved is a better versatility thanks to helpers and hooks along with it.
If you take a look a little deeper, you will arrive at ./core/lib/modules.ts where module signature and registerModule function take up seats. registerModule is the hard worker who works in src/modules/index.ts to register modules pushing individuals into registeredModules. (Beware the small difference in those names as in registerModule, registeredModules, registerModules and so on, might be confusing if you skim it, but they are correct and appropriate in its own role with matching names)
With this approach our module development experience is much straight-forward and Vue native API friendly so that code becomes simpler, cleaner and maintainable.
Now you are officially a Vue Storefront module developer. Congratulation!
# 4. Chef's secret (protip)
# Secret 1. Lazy loading in practical examples
# Secret 2. How a module can be leveraged to build extensions or integrations with.
# Secret 3. On the border of modularity
# 2. Best practices for tweaking a module
Once you got the hang of building a skeleton for modules, now it's time for working a real deal with modules. There are tons of opportunities here with freedom of building new modules powered by variety of methods available being mainly in a sense with working, extending and hooking to Vue's main parts.
In this recipe, we walk through steps to building a simple module for Like button in product page. This recipe browses a brief concept of each topic for the demonstration purpose. The full details for building the module continues at Recipe 7. Building a module from A to Z
# 1. Preparation
- You need a new module to play with. You would already have had one if you finished Recipe 1. How to bootstrap a module
# 2-1. Recipe A (Extend Vuex store from inside a module)
Vue Storefront takes advantage of Vuex's module feature. You can encapsulate your module's data from global scope so that control over your data is secured easily within your grasp.
- Open the
index.tsfile ofexample-moduleat./src/modules/example-module
cd src/modules/example-module
vi index.ts # of course you can open it with other editors!
- Prepare a store for the module as follows :
import { StorefrontModule } from '@vue-storefront/core/lib/modules';

const exampleModuleStore = {
  namespaced: true,
  state: {
    key: null
  }
}

export const ExampleModule: StorefrontModule = function ({app, store, router, moduleConfig, appConfig}) {
// abridged ...
namespaced with true value means this store is encapsulated inside a module and not registered to global store.
state contains data object you want to track.
- Register this
storeto app'sstorewithregisterModule:
import { StorefrontModule } from '@vue-storefront/core/lib/modules';

const exampleModuleStore = {
  namespaced: true,
  state: {
    key: null
  }
}

export const ExampleModule: StorefrontModule = function ({app, store, router, moduleConfig, appConfig}) {
  store.registerModule('example-module', exampleModuleStore);
}
registerModule method is a Vue native API to dynamically register a store for each module. Vue Storefront Module uses this method for data store so that module data is encapsulated from global scope. more info (opens new window)
Consider the store as a Model in plain MVC model.
- You can add Vuex
pluginsto your store.
import { StorefrontModule } from '@vue-storefront/core/lib/modules';

const examplePlugin = store => {
  store.subscribe((mutation, state) => {
    if (mutation.type === 'PRESSED_LIKE') {
      console.log('Customer pressed LIKE button on the product');
    }
  })
}

const exampleModuleStore = {
  namespaced: true,
  state: {
    key: null
  },
  plugins: ['examplePlugin']
}

export const ExampleModule: StorefrontModule = function ({app, store, router, moduleConfig, appConfig}) {
  store.registerModule('example-module', exampleModuleStore);
}
plugins are handy when you want to plug in an event to mutation of state.
mutation is an object that contains type and payload. By checking mutation type, you can listen to the certain type of state changes. more info (opens new window)
You can also listen not only to mutations but also to actions as follows :
store.subscribeAction((action, state) => {
  console.log(action.type)
  console.log(action.payload)
})
It also provides before and after decorator to when the plugin should be fired of the event. (available since 3.1.0) more info (opens new window)
# 2-2. Recipe B (Override Vuex store with extendStore)
Vue Storefront people came up with the idea to help module developers easily extend the module store already registered with the same name.
- Open the
index.tsfile ofexample-moduleagain at./src/modules/example-module
cd src/modules/example-module
vi index.ts # of course you can open it with other editors!
- Import
helpersof core as follows :
import { extendStore, isServer } from '@vue-storefront/core/helpers';
import { StorefrontModule } from '@vue-storefront/core/lib/modules';

const examplePlugin = store => {
// abridged ...
- Add an additional
productstore :
// ... abridged
  plugins: ['examplePlugin']
}

const newProductModule = {
  state: {
    liked: false
  }
}

export const ExampleModule: StorefrontModule = function ({app, store, router, moduleConfig, appConfig}) {
// abridged ...
- Run
extendStorehelper method to override or add to existing storeproductas follows :
export const ExampleModule: StorefrontModule = function ({app, store, router, moduleConfig, appConfig}) {
  store.registerModule('example-module', exampleModuleStore);

  extendStore('product', newProductModule);
}
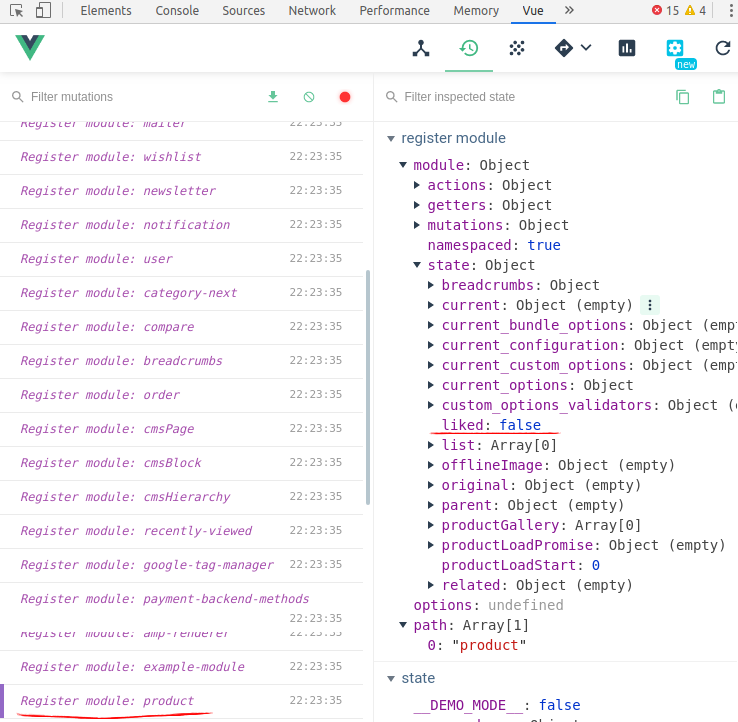
- In order to confirm it's successfully extended, we will use Chrome vue-devtools extension (opens new window) which really comes in handy when you develop Vue.js application.
Open Chrome DevTools and go to Vue tab, and click Vuex tab or click ctrl + 2. Finally click Register module : product, then you will see a screen like as follows confirming product store has been extended successfully :
TIP
You may use vue-devtools for Firefox if you use Firefox. Install Firefox vue-devtools (opens new window)
# 2-3. Recipe C (Extend router instance)
You can also dynamically add routes for your module using Vue native API.
- Create a dummy Vue component
Liked.vuejust to testrouteatcomponentsdirectory from./src/modules/example-moduledirectory.
cd src/modules/example-module
mkdir components && cd components && vi Liked.vue
- Fill the file with dummy template code as follows :
<template>
  <p>{{ greeting }} World and you {{liked}}! </p>
</template>

<script>
module.exports = {
  data: function () {
    return {
      greeting: 'Hello',
      liked: 'Liked it'
    }
  }
}
</script>

<style scoped>
p {
  font-size: 2em;
  text-align: center;
}
</style>
- Go back to parent directory, open
index.tsfile and work on the module router as follows :
import { extendStore, isServer } from '@vue-storefront/core/helpers';
import { StorefrontModule } from '@vue-storefront/core/lib/modules';
import Liked from './components/Liked.vue'; // Import the component

const examplePlugin = store => {

// abridged ...

  state: {
    liked: false
  }
}

const exampleRoutes = [{ name: 'liked', path: '/liked', component: Liked, alias: '/liked.html' }]; // compose the router we will use

export const ExampleModule: StorefrontModule = function ({app, store, router, moduleConfig, appConfig}) {
  store.registerModule('example-module', exampleModuleStore);

  extendStore('product', newProductModule);

  router.addRoutes(exampleRoutes) // adding routes here
  router.beforeEach((to, from, next) => { next() }) // navigation guards here
}
Routes to be added must be Array type even if it only has one element as you can see it with exampleRoutes above. Each route object has name, path, component and alias property and it's pretty straightforward about what they are.
addRoutes is Vue native API to add routes dynamically to the router.
beforeEach is the navigation guard Vue API provides. more info (opens new window)
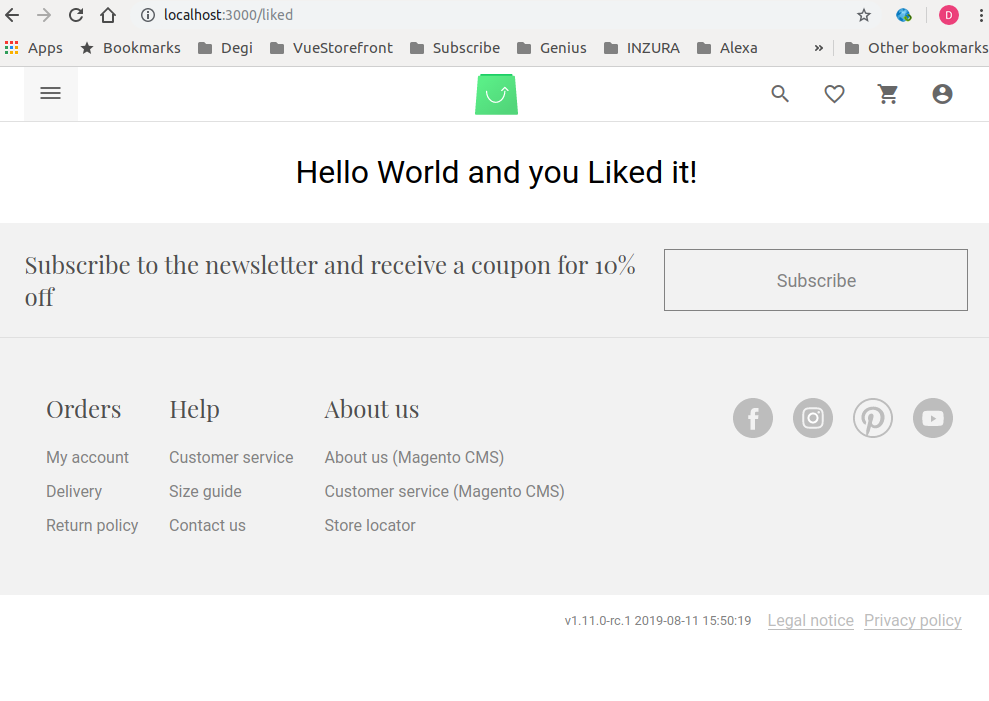
- Open your browser and visit the route
/likedwe just created then you will see a screen like this :
# 2-4. Recipe D (Use hooks)
One of the most intuitive way to build a module is using hooks. Open source creators more than often intentionally leave hooks as many as possible to everywhere they think extendable for 3rd party developers to inject logic into the flow of program. Here we will look into how Vue Storefront did it its way.
- Open the
index.tsfile ofexample-moduleagain at./src/modules/example-module
cd src/modules/example-module
vi index.ts # of course you can open it with other editors!
- Import
coreHooksfromcore:
import { extendStore, isServer } from '@vue-storefront/core/helpers';
import { StorefrontModule } from '@vue-storefront/core/lib/modules';
import Liked from './components/Liked.vue';
import { coreHooks  } from '@vue-storefront/core/hooks'; // Import hooks from core

const examplePlugin = store => {
// abridged ...
- Call any hook you want to use as follows :
// ...abridged

export const ExampleModule: StorefrontModule = function ({app, store, router, moduleConfig, appConfig}) {
  store.registerModule('example-module', exampleModuleStore);

  extendStore('product', newProductModule);

  router.addRoutes(exampleRoutes)
  router.beforeEach((to, from, next) => { next() })

  coreHooks.afterAppInit(() => { //
    console.log('App has just been initialized')
  })
}
- Confirm it's hooked, run the command at Vue Storefront root path to bootstrap Vue Storefront app
docker-compose up
or without docker
yarn dev
Once again the app is up and running, it will spit out tons of logs indicating the jobs done including :
app_1  | [module] VS Modules registration finished. { succesfulyRegistered: '0 / 0', registrationOrder: [] }
app_1  | App has just been initialized # Successfully Hooked !
app_1  | Result from ES for 3e9eb2ab7b4d96276c016ae9d5aa18116483667603e7e84ad2346627 (category),  ms=613 null
app_1  | whole request [/liked]: 1323ms
You can read more in depth
# 2-5. Recipe E (Manage module-level config)
Sometimes you may need to pass values to populate fields in your module configuration. We give you the ability to pass a config object to registerModule function, giving you options to choose when you register the module.
Suppose you need to use a 3rd party service integrated to your storefront. Most of the time you need to provide an API credentials encapsulated in a request to the 3rd party so that they will know you are you and process a service and return a result that belongs to you. This recipe tells you how to do it with using 3rd party account during module registration.
- Open the
index.tsfile ofexample-moduleagain at./src/modules/example-module
cd src/modules/example-module
vi index.ts # of course you can open it with other editors!
- Prepare the module to accept dynamic
moduleConfigoption where you want to allow to override values as follows :
// ...abridged

export const ExampleModule: StorefrontModule = function ({app, store, router, moduleConfig, appConfig}) {
  store.registerModule('example-module', exampleModuleStore);
  // ... abridged ...

  // Prepare apiKey for a request to a 3rd party to integrate with it, example as follows :
  if (moduleConfig.apiKey) {
    const apiKey = moduleConfig.apiKey
  } else {
    // raise an error related to failure for sign-in to 3rd party service due to lack of apiKey
  }

  // Continue to send a request to the 3rd party as the context demands
  // ... abridged for the sake of brevity ...

  console.log(apiKey); // This line helps you confirm apiKey value is overridden as intended
}
This indicates moduleConfig object has apiKey option for providing a choice for module user when registering it.
- Go to parent directory, open
index.tswhich is./src/modules/index.tsand fix the code as follows :
// ... abridged

  registerModule(AmpRendererModule)
  registerModule(InstantCheckoutModule)

  registerModule(ExampleModule, {
    apiKey: "YOUR_VALUABLE_API_KEY_ON_THE_FLY"
  }) // Here you pass config object as you want it
}

// abridged ...
- In order to confirm
moduleConfigoption passed as planned, run the command at Vue Storefront root path to bootstrap Vue Storefront app
docker-compose up
or without docker
yarn dev
Once again the app is up and running, now look for the part we injected :
app_1  | [module] VS Modules registration finished. { succesfulyRegistered: '0 / 0', registrationOrder: [] }
app_1  | YOUR_VALUABLE_API_KEY_ON_THE_FLY # moduleConfig injected successfully !
app_1  | Calling asyncData in Home (theme) null
You can read more in depth
# 2-6. Recipe F (Access app-level config)
When you work on building a module in Vue Storefront, you can also access app's config. config is compiled version of ./config folder which is normally a copy of local.json. When you need to access config, you can do it inside a module.
- Open the
index.tsfile ofexample-moduleagain at./src/modules/example-module
cd src/modules/example-module
vi index.ts # of course you can open it with other editors!
- Call a node of
configinside amoduleas follows :
// ... abridged

export const ExampleModule: StorefrontModule = function ({app, store, router, moduleConfig, appConfig}) {
  console.log(appConfig.products.defaultFilters); //  "products": {"defaultFilters": ["color", "size", "price", "erin_recommends"]}

// abridged ...
- You can see the log as follows if you bootstrap your Vue Storefront app :
app_1  | [GTM] Google Tag Manager extensions is not working. Ensure Google Tag Manager container ID is defined in config null
app_1  | [ 'color', 'size', 'price', 'erin_recommends' ] # here we go! successfully fetched global app config
app_1  | [module] VS Modules registration finished. { succesfulyRegistered: '0 / 0', registrationOrder: [] }
app_1  | This is one way to use moduleConfig
# 2-7. Recipe G (Setting up server module)
We strongly recommend using kind of HTTP server as a proxy in front of Vue Storefront. Let it be nginx (suggested in our production setup docs) or Varnish or even Apache. Any of those HTTP servers allows you to add some authorization or redirects layer before Vue Storefront.
This is a recommended way.
# 1. Advanced Output Processing
However, by using advanced output processing you can easily generate any text data output from your Vue Storefront site you want. Including JSON, XML and others. It's a way to generate sitemaps and other data based documents.
# 2. Express.js middleware
The other option is to create a Express.js middleware. Our core/scripts/server.ts is a classical Node.js application so it should be easy. To do so you might want to create a server module (opens new window).
Server modules are located in src/modules and always have the server.ts entry point which responds to one of the few server entry points:
afterProcessStarted- executed just after the server started (opens new window).afterApplicationInitialized- executed just after Express app got initialized (opens new window). It's a good entry point to bind new request handlers (app.get(...),app.use(...)). Read more on Express.js request handlers and routing (opens new window).beforeOutputRenderedResponse- executed after the SSR rendering has been done (opens new window) but before sending it out to the browser; It lets you override the rendered SSR content with your own.afterOutputRenderedResponse- executed after advanced output processing pipeline (opens new window) executed.beforeCacheInvalidated,afterCacheInvalidated- executed before and after cache has been invalidated (opens new window)
Here is an example how to bind (opens new window) tracing module just after server process started:
import { serverHooks } from '@vue-storefront/core/server/hooks'

serverHooks.afterProcessStarted((config) => {
  let trace = require('@google-cloud/trace-agent')
  if (config.has('trace') && config.get('trace.enabled')) {
    trace.start(config.get('trace.config'))
  }
})
Another example (opens new window) - pretty common case - binding new Express middleware to process all user requests BEFORE they're processed by SSR rendering pipeline (including custom URL addresses):
import { serverHooks } from '@vue-storefront/core/server/hooks'

const compression = require('compression')
serverHooks.afterApplicationInitialized(({ app, isProd }) => {
  if (isProd) {
    console.log('Output Compression is enabled')
    app.use(compression({ enabled: isProd }))
  }
})
If you'd like to bind custom URL address this example can be modified like this:
import { serverHooks } from '@vue-storefront/core/server/hooks'

serverHooks.afterApplicationInitialized(({ app, isProd }) => {
  app.get('/custom-url-address', (req, res) => {
    res.end('Custom response')
  })
})
# 3. Peep into the kitchen (what happens internally)
# 4. Chef's secret (protip)
# 3. Hooking into hooks
Hooks are common development method written by core developers to allow 3rd party developers or module developers to inject their own logic at predefined spots of the program. With this approach, the software can be flexible in design, so that it helps handle issues which were unknown at the time it was designed initially.
Core developers usually strive to optimize where to put hooks. In Vue Storefront, hooks generally fall under either of two groups. One of each is listener; it allows us to do something at certain moment of application lifecycle. The other of each is mutator; it allows us to modify internal objects before app performs some actions.
In this recipe, we look into where they are and how this can be applied to your module development.
# 1. Preparation
- You need a new module to play with. You would already have had one if you finished Recipe 1. How to bootstrap a module
- You need multistores set up (We assume you have set another store up whose
storeCodeisde)
NOTICE
This recipe deals with hooks as of 1.10. If you work with other versions of Vue Storefront, please bear in mind they might be different in detail.
# 2. Recipe
OBJECTIVE
We build a module that applies a discount to certain storeviews only.
- Make up a list of requirements for the module as follows :
- Need configurations as to which
storeviewsmay apply to the discount and how much it should be. - Need to apply discount to the price of products in
category,productpages. - Need a list of points where the discount should be verified.
- Now start with the first item, create a configuration for the module to consume.
  discountStore: {
      "enableDiscountPerStoreViews": true,
      "storeViewsToApplyTo": ["de"],
      "globalDiscountInPercentage": 25,
      "allowLocalOverride": true
  }
discountStorecontains nodes of configuration for our module.enableDiscountPerStoreViews: This value determines whether to set this module enabled or not.storeViewsToApplyTo: This array contains thestoreviewscode.globalDiscountInPercentage: This value is how much discount should be applied to targetstoreviews.allowLocalOverride: This value allows to override discount dynamically.
- Create a module whose name is hookExample (change to your liking)
# 3. Peep into the kitchen (what happens internally)
# 4. Chef's secret (protip)
# Secret 1. The list of hooks
cart
beforeSync:afterSync:beforeAddToCart:afterAddToCart:beforeRemoveFromCart:afterRemoveFromCart:
order
beforePlaceOrder:afterPlaceOrder:
user
afterUserAuthorize:afterUserUnauthorize:
appglobal level
beforeStoreViewChange:afterStoreViewChange:afterAppInit:
NOTICE
The list is of course subject to change, it grows for each core module to handle all use cases.
# Secret 2. The core hooks design
# Secret 3. Rewriting the module again without the hooks
# 4. On Module configuration
Configuration is a basic template for options designed by developers that users may change to their own liking. Those changes made and saved will change the course of software during its lifecycle based on values of configuration.
Configuration tends to have default values which entails default behaviors of the program so that users don't have to bother if they are OK with default behaviors. Best user experience with flexibility can be achieved with carefully designed configuration with default values.
# 1. Preparation
# 2. Recipe
# 3. Peep into the kitchen (what happens internally)
# 4. Chef's secret (protip)
# 5. Packaging a module
It's hands down no-brainer to bootstrap a module manually because the skeleton required for minimum signature is dead simple and straightforward. Compared to the CLI method, however, the manual method is usually prefered for local development, in other words, a project-specific module is structured with the manual method for better legibility. In contrast, CLI method can help you build your module easily as a npm package by providing you with the boilerplate.
# 1. Preparation
# 2. Recipe
# 3. Peep into the kitchen (what happens internally)
# 4. Chef's secret (protip)
# 6. Extend Elasticsearch request body using storefront-query-builder
If you're using the new storefront-query-builder (opens new window) and the api-search-query search-adapter (introduced with v1.1.12) it is now possible to extend it by new filters, or even overwrite a existing filter, to customize your Elasticsearch request-bodies.
So, this way you can add custom Elasticsearch queries to the query-chain and still use the notation of SearchQuery in the Vue Storefront.
Note: This will only work from
storefront-query-builderversion1.0.0andvue-storefrontversion1.12.2.
# Usecases
One usecases where this feature would come in handy is for example if you like to add complex queries on multiple points in your source code. Using the following technique you can just add a custom filter to your SearchQuery in a single line inside your VSF source-code using the query.applyFilter(...) method and then add the complex logic into your custom-filter inside the API.
# Registering a new filter
The vue-storefront-api will only try to load filters that are registered in the configs. The extension/module, that contains the filter, must be enabled and the new filter module-classes needs to be registered in its extension config inside the catalogFilter array. The filter files must be located inside filter/catalog/ of your module folder.
For example: If you have a module called extend-catalog with a filter called StockFilter, the file path to filter would be src/api/extensions/extend-catalog/filter/catalog/StockFilter.ts and the config would look like:
{
  "registeredExtensions": [ "extend-catalog" ],
  "extensions": {
    "extend-catalog": {
      "catalogFilter": [ "StockFilter" ]
    }
  }
}
# Filter module-class properties
The filter can contain four different properties. Followed a short explaination, what they are doing.
check– This method checks the condition that be must matched to execute the filter. The first valid filter is executed – all afterwards are ignored.priority– This is the priority in which the filters are going to be called. The sort is lower to higher.mutator– The mutator method is in charge of prehandling the filter value, to e.g. set defaults or check and change the type.filter– This method contains the query logic we wan't to add and mutates thebodybuilderquery-chain.
# Example
Lets assume we like to add a possibility to add a default set of product-attribute filters we can apply to each SearchQuery without repeating ourselfs in source-code. So, for example, it should filter for two color's and a specific cut to supply a filter for spring-coloured short's we implement at several places in our VSF.
# Changes in vue-storefront repository
The query in the VSF code would look like this (that's it on the VSF side):
import { SearchQuery } from 'storefront-query-builder'
import { quickSearchByQuery } from '@vue-storefront/core/lib/search'

//...

const query = new SearchQuery()
query.applyFilter({ key: 'spring-shorts', value: 'male', scope: 'default' })
const products = await dispatch('product/list', { query, size: 5 })
# Changes in vue-storefront-api repository
In the vue-storefront-api we are going to add the real filter/query magic.
There is already an example module called example-custom-filter which we are going to use for our filter.
As you look inside its module folder src/api/extensions/example-custom-filter/, you will find a child folder filter/catalog/ with all existing custom filters for this module. Inside this folder we are going to duplicate the existing SampleFilter.ts into another one called SpringShorts.ts – this is our new custom filter module-class.
This file needs to be registered in the config JSON to let the API know that there is a new custom filter inside our extension.
Therefore you open your default.json or specific config JSON file and add our new filename SpringShorts to the config node extensions.example-custom-filter.catalogFilter array.
Our SpringShorts.ts contains an object that contains four properties: priority, check, filter, mutator. We don't need a mutator nor priority, so we can remove these lines. check and filter needs to be changed to fulfill our needs. So, this is how our filter finally looks like:
import { FilterInterface } from 'storefront-query-builder'

const filter: FilterInterface = {
  check: ({ attribute }) => attribute === 'spring-shorts',
  filter ({ value, attribute, operator, queryChain }) {
    return queryChain
      .filter('terms', 'pants', [ 'shorts' ])
      .filter('terms', 'cut', [ 1, 2 ])
      .filter('terms', 'color', [ 3, 4 ])
      .filter('terms', 'gender', [ value ])
  }
}

export default filter
Inside check we tell the filter to just be applied if the attribute is named exactly spring-shorts.
Inside filter we extend the Elasticsearch query-chain by our desired filters, using the bodybuilder library syntax.
That's it, now we are able to filter by a complex query in only one line inside VSF.
# 7. Working with translations in module
Translations are provided in core/i18n/resource/i18n/{your-locale}.csv file and can be extended or overridden in src/modules/{my-module}/resource/i18n/{your-locale}.csv accordingly, but translations from src/themes/{my-theme}/resource/i18n have a bigger priority than translations from src/module/{my-module}/resource/i18n.
# Example
Here's an example of en-US.csv for en-US locale:
"customMessage","Here is the core message that can be overwritten in the module"
When you create the en-US.csv file within your src/modules/{my-module}/resource/i18n/ folder and override some messages like:
"customMessage","You can define or override translation messages here."
... you may expect that $t('customMessage') will return You can define or override translation messages here. instead of Here is the core message. that can be overwritten in the module.
# 8. Tests in module
Our jest config allows you to write tests for each module which you have created.
To create a test, you have to create a file inside src/modules/{my-module}/test/unit/. The file has to end with .spec.ts or .spec.js. Generally, it has to match this pattern: src/modules/{my-module}/test/unit/{my-test}.spec.(js|ts).